
Creating a Self-Hosted Microsoft 365 & Google Workspace Alternative Using Open Source Tools
#OpenSource #Microsoft365 #GoogleWorkspace
by Jaipreet Soni
Table of Contents
What Are We Building?
After Microsoft abruptly suspended services for Nayara Energy without prior notice, concerns about data sovereignty, vendor lock-in, and cloud dependency have grown louder. This incident has made it clear: relying solely on big tech platforms like Microsoft 365 or Google Workspace can leave organizations vulnerable.
Thankfully, with open-source technologies, you can build your own private cloud productivity suite on a VPS — with full control, better privacy, and no recurring subscription fees.
We’re creating a self-hosted alternative to cloud services like Google Workspace and Microsoft 365. You’ll be able to:
-
Sync files across devices
-
Edit documents online (Word, Excel, etc.)
-
Use calendar, tasks, mail client
-
Share and collaborate — securely & privately
We’ll use:
-
TrueNAS SCALE – Base OS with storage + apps (Docker & Kubernetes ready)
-
Docker(Dockge): Container engine to manage apps like Nextcloud
-
Nextcloud: The all-in-one collaboration suite
-
Cloudflare Tunnel: Free & secure access to your server over the internet
Step 1: Install TrueNAS SCALE
Why TrueNAS SCALE?
-
Runs on servers or NAS hardware
-
Manages storage and apps easily
-
Has built-in Docker & Kubernetes support
-
Includes an App Store (Nextcloud, OnlyOffice, etc.)
👉 Download here: TrueNAS Community Edition
Step 2: Install Core Apps
Once TrueNAS SCALE is set up, install the following apps from the Apps section:
-
Dockge → To manage Docker Compose YAML stacks
-
File Browser (File Manager) → To browse, upload, and manage files in your datasets
Even though you can install Nextcloud using app store in the TrueNAS, we’re gonna install it using Dockge
Step 3: Deploy Nextcloud with Dockge
Instead of using the TrueNAS App Store, you can run Nextcloud via Dockge for more control.
Create a docker-compose.yml inside Dockge with the following:
services:
  nextcloud:
    image: lscr.io/linuxserver/nextcloud:latest
    container_name: nextcloud
    environment:
      - PUID=568
      - PGID=568
      - TZ=Asia/Kolkata
    volumes:
      - /mnt/Nextcloud/configs/nextcloud/config:/config
      - /mnt/Nextcloud/configs/nextcloud/data:/data
      - /mnt/Nextcloud/media:/external
    ports:
      - 8887:443
    restart: unless-stopped
Then in Dockge:
-
Add a new stack
-
Paste the above YAML
-
Deploy
Now your Nextcloud is available at https://your-server-ip:8887
Installing FileBrowser for Easy File Management
Managing files directly inside your server can be a little tricky if you’re only using the command line. To make this process smoother, we decided to install FileBrowser — a lightweight web-based file manager.
With FileBrowser, we get a clean web interface where we can:
-
Browse all datasets and directories
-
Upload, download, and edit files directly from the browser
-
Create, rename, or delete folders with just a click
-
Manage permissions and access easily
services:
  filebrowser:
    image: filebrowser/filebrowser:latest
    container_name: filebrowser
    user: 0:0 # or match PUID/PGID to your user
    volumes:
      - /mnt:/srv # <-- this gives access to all datasets under /mnt
    ports:
      - 8080:80
    restart: unless-stopped
We installed FileBrowser through Dockge, which makes container management extremely simple. With just a few clicks, Dockge pulls the official FileBrowser image and runs it inside a Docker container. Once installed, FileBrowser is accessible through a browser window, giving us a powerful yet user-friendly way to manage files stored on our TrueNAS server.
This means no more struggling with SSH or command-line file operations — everything is available through a clean and intuitive interface.
Step 4: Access Nextcloud & Install Essential Apps
Once Nextcloud is running:
-
Open your browser →
https://your-server-ip:8887 -
Log in with the admin account you created
-
Go to Apps → App Store inside Nextcloud
-
Install these essential apps:
-
Nextcloud Office (Docs) → Word/Excel/PowerPoint editing
-
Mail → Email client inside Nextcloud
-
Calendar → Shared calendar with sync
-
Contacts → Centralized contact management
-
Tasks → Personal & team task lists
-
Deck → Kanban-style project boards
-
Notes → Markdown-based notes
This turns your Nextcloud into a complete productivity hub (Docs + Gmail + Calendar + Trello alternatives).
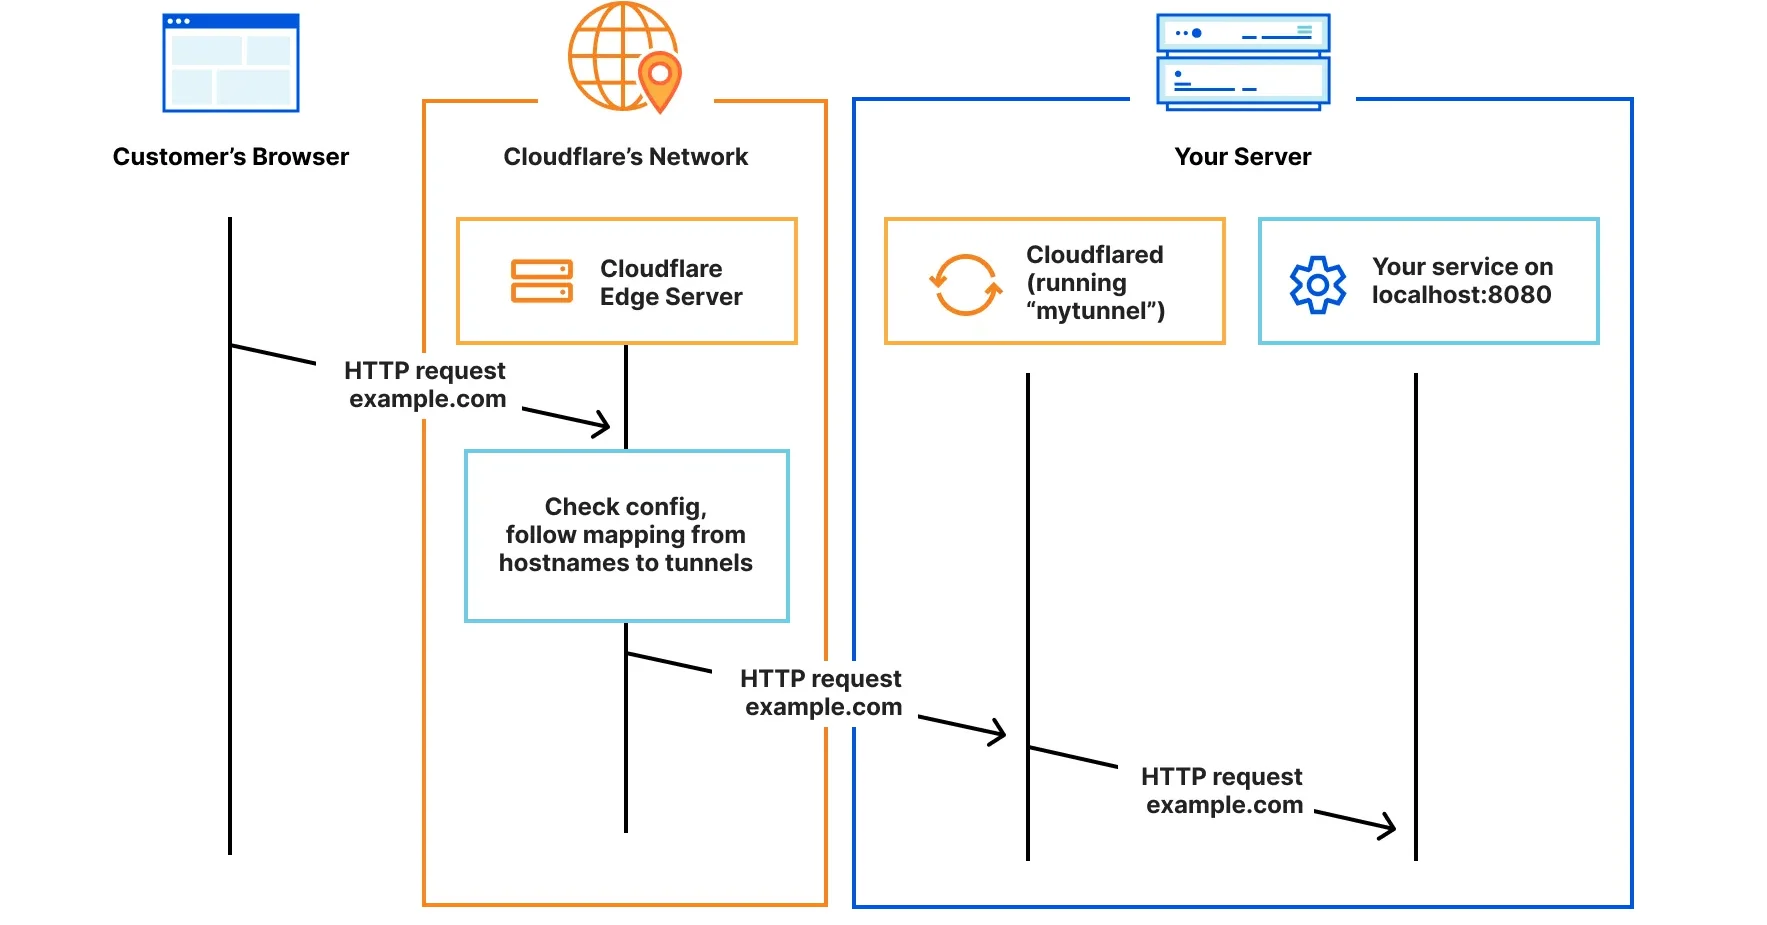
Step 5: Setting Up Cloudflare Tunnel for Secure Remote Access
Why Cloudflare Tunnel?
Normally, to access your server over the internet, you need to configure port forwarding on your router and deal with dynamic IPs. Cloudflare Tunnel removes all that — no port forwarding, no public IPs needed.
Now that Nextcloud is running locally, the next step is to make it securely accessible from anywhere in the world using Cloudflare Tunnel. This avoids exposing your home server directly to the internet while still giving you encrypted access through a custom subdomain.
1. Create a Cloudflare Account
-
Go to Cloudflare and sign up for a free account.
-
Add your domain to Cloudflare and update your domain registrar’s nameservers to point to Cloudflare.
2. Create a Tunnel in Cloudflare
-
In your Cloudflare dashboard, go to Zero Trust → Access → Tunnels.
-
Click Create Tunnel and follow the prompts.
-
Once the tunnel is created, Cloudflare will generate a Docker config with your tunnel ID.
-
Copy the entire config into a notepad and save it (we’ll need the Tunnel ID later).
3. Install Cloudflare Tunnel App in TrueNAS
-
Open your TrueNAS Apps section and search for Cloudflare Tunnel.
-
Install the app, and when prompted, paste the Tunnel ID you copied earlier.
4. Create a Subdomain in Cloudflare
-
Go back to your Cloudflare dashboard.
-
Add a DNS record for your tunnel, e.g.,
cloud.yourdomain.com. -
Set it to HTTPS and disable TLS Verify.
-
Save the changes.
5. Fix the Nextcloud Domain Access Error
At this point, if you try opening your subdomain, you may see an error saying Nextcloud doesn’t recognize the domain. To fix this:
-
Go to your TrueNAS File Manager.
-
Navigate to the Nextcloud config file: /mnt/tank/stacks/nextcloud/config/www/nextcloud/config/config.php
-
Open the file and find the trusted domains array section.
-
Add your Cloudflare subdomain, for example:
'trusted_domains' =>
array (
  0 => 'localhost',
  1 => 'cloud.yourdomain.com',
),- Save the file and restart your Nextcloud container.
6.Done!
Now, when you visit https://cloud.yourdomain.com, you’ll be able to securely access your Nextcloud instance from anywhere through Cloudflare’s encrypted tunnel.
Recap – What Did We Just Do?
| Component | Purpose |
|---|---|
| TrueNAS Community Edition | Base operating system & storage management platform |
| Dockge | Runs Nextcloud in an isolated container (container management in TrueNAS) |
| Nextcloud | Collaboration suite (files, docs, calendar, etc.) |
| Cloudflare Tunnel | Makes your server publicly accessible (without exposing your home IP) |
Bonus Tip: Use Nextcloud mobile & desktop apps
-
Install the Nextcloud app on your phone and computer.
-
It auto-syncs your files, photos, and documents to your server.
-
You’ll always have your data with you, even offline.
Super simple, but it makes your setup way more useful
Your Own Self-Hosted Google Workspace & Microsoft 365 Alternative
You’ve successfully deployed your own self-hosted cloud productivity suite on Linux using Docker — completely under your control and free from third-party restrictions.
What You’ve Built:
-
Nextcloud – A powerful platform for file sharing, collaboration, calendar, and contacts
-
Docker Compose – For seamless deployment and scalability
Why This Matters:
-
Private & Secure: You own your data — no third-party snooping
-
No Subscription Fees: Say goodbye to costly cloud service providers
-
Scalable & Flexible: Easily add features or scale your setup on any VPS
-
Open-Source Power: Built on trusted and transparent software
With your own VPS and a bit of Linux know-how, you’ve taken a major step toward digital independence. Keep exploring, customize your stack, and make it truly yours!
Acknowledgements
I would like to express my gratitude for the availability of open-source technologies that made this project possible. Tools like TrueNAS Community Edition, Dockge, Nextcloud, and Cloudflare Tunnel(not open source, but essential to this project) provided the foundation to build a secure, efficient, and accessible self-hosted collaboration platform.
Special thanks to the developer communities behind these projects for their continuous efforts in improving, documenting, and supporting open-source software. Without their dedication, this setup would not have been achievable.
Finally, I would also like to thank everyone who guided, inspired, and supported me throughout this project journey.